These methods include taking advantage of unique items, scrolls, or techniques that aren’t necessarily obvious to the average explorer setting out on their first adventure across the Sword Coast. As with all things in BG3, making encounters easier will require careful planning, strategizing, and thinking ahead. Here’s a look at ten easy ways to get past some of the toughest encounters in Baldur’s Gate 3.
The Secluded Cove
Calm Emotions, Silence, And Sanctuary
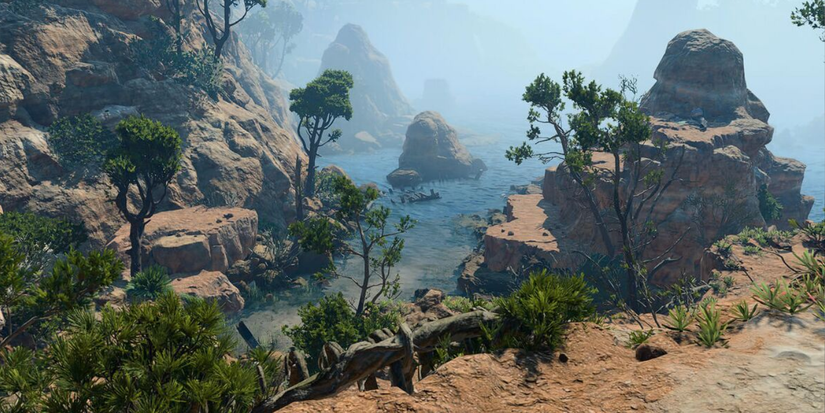
Behind Druid’s Cove, you will find a group of Harpies luring Mirkon into the Secluded Cove as part of the “Investigate the Beach” quest. Luckily, the encounter is much easier if you use Shadowheart or another dedicated Cleric/Bard to cast ![]() Calm Emotions on the entire party before entering the fight, effectively negating the effects of the Harpy’s song for 10 turns. This spell prevents Humanoids from being Charmed, the key effect of the Harpy’s Luring Song.
Calm Emotions on the entire party before entering the fight, effectively negating the effects of the Harpy’s song for 10 turns. This spell prevents Humanoids from being Charmed, the key effect of the Harpy’s Luring Song.
If you have a tough time stopping the Harpies from luring Mirkon in, they can cast ![]() Silence on him (or the singing Harpy). Another option is to cast Sanctuary on Mirkon, though each spell requires concentration, so having both a Bard and a Cleric in the party will benefit this encounter.
Silence on him (or the singing Harpy). Another option is to cast Sanctuary on Mirkon, though each spell requires concentration, so having both a Bard and a Cleric in the party will benefit this encounter.
Flind And The Zhent Survivors
Illithid Mind Control Goes A Long Way

You can come upon the Gnolls on the Risen Road early in your adventure and will likely be under-prepared if they don’t know what’s coming. However, peacefully approaching the Gnoll leader, Flind, and passing a series of Wisdom checks with Illithid powers can bypass the entire battle, as long as you don’t mind a scorched-earth approach to the situation.
Saving Rugan and Olly for the “Find the Missing Shipment” quest requires killing Flind and the Gnolls instead (the quest can be completed as long as the chest isn’t opened).
The first dialogue check results in Flind and the Gnoll patrol storming the cave and killing the Zhent survivors inside, and following up with Flind can result in her feasting upon her entire crew and ultimately herself. You can pick up the shipment at that point, having never entered combat.
Hammer Time In The Grymforge
That’s Going To Leave A Mark

One of the hardest boss fights in Act 1, Grym will have you Reeling (literally) if you aren’t aware of its unique Superheated condition, and more importantly, how to strategically use the environment to their advantage. While Grym seems nearly invincible, you can position one member of the party next to the forge lever as a second member baits Grym through the lava and toward the hammer by attacking it, triggering the Prime Target ability – this will lock Grym into attacking the last enemy to deal it damage.
The lava will engage Grym’s Superheated condition, making it vulnerable to damage, and dropping the hammer while it is Superheated will knock him prone and deal massive damage. Magma Mephits will spawn after hitting Grym with the forge hammer, which the remaining party members can handle.
Auntie Ethel, Meet Magic Missile
Magic Missile: Works Every Time

Arguably, the most difficult part of the Auntie Ethel Hag fight is during her final phase, where she begins cloning herself, eventually cloning herself as Mayrina. There are a couple of tricks that make this aspect of the encounter much easier: dousing Mayrina in water to track the Wet debuff condition and bombarding the Hag clones with ![]() Magic Missiles to easily remove them from the fight while keeping the real Hag in focus. As experienced players know, Magic Missile deals low damage but cannot miss.
Magic Missiles to easily remove them from the fight while keeping the real Hag in focus. As experienced players know, Magic Missile deals low damage but cannot miss.
Since the Hag clones will disappear if they take any damage, Magic Missile is the perfect spell for the situation. It’s also ideal for bringing the real Hag down to low health without killing her to obtain the hallowed Hag’s Hair.
Balthazar: A Push In The Right Direction
Bring A Strong Party Member To The Shadowfell With You

While this encounter can be incredibly frustrating, a very easy way to beat BG3‘s Balthazar in the Shadowfell is simply having a high Strength character such as Lae’zel or Karlach push him off the ledge. It’s even possible to turn one of them invisible and do this before the cut-scene is triggered with the Nightsong. However, taking part in the cut-scene and eventual battle will require positioning the party strategically on the platform and giving Balthazar a solid shove, sending him into the abyss.
You will miss out on some relatively useless loot in going about things this way, but it’s a small price to pay to get past an otherwise difficult encounter. Thunderwave can also be used to propel him and his Undead minions over the ledge as well.
Convince Yurgir To Give It All Up
He Will Thank You In The End

Yurgir and his hoard of Merregon Legionnaires will ambush the party in the Gauntlet of Shar, but if you bring a party member with high Charisma to pass some high Persuasion and Insight checks, Yurgir can be tricked into killing himself, bypassing the difficult fight altogether. To get him to do the unthinkable, you will need to roll a successful passive Insight check and figure out the “secret” to his contract, then pass a series of 21 Persuasion checks and a 21 Charisma check.
Each successful check results in Yurgir killing a tough member of his posse and, eventually, himself. The good news is that tricking Yurgir actually saves him in the end, and he will be available to fight by your side against Raphael later on after passing yet another high Persuasion check.
Defending Halsin’s Portal
Hello Darkness, My Old Friend

During Bladur’s Gate 3‘s Act 2, as part of lifting the Shadow Curse, you will have to defend the portal for Halsin as he retrieves Thaniel from the Shadowfell. One incredibly effective strategy that makes this fight way easier is to cast ![]() Darkness on the portal. Darkness has a unique effect that prevents ranged attacks going into or out of the cloud. This will come in very handy when defending the portal, as enemies need to get within melee range to deal any damage.
Darkness on the portal. Darkness has a unique effect that prevents ranged attacks going into or out of the cloud. This will come in very handy when defending the portal, as enemies need to get within melee range to deal any damage.
Another crucial strategy for this encounter is having Shadowheart (or another Cleric or Bard) cast Radiant ![]() Spirit Guardians and run around the area to take out the lesser enemies that spawn throughout the encounter.
Spirit Guardians and run around the area to take out the lesser enemies that spawn throughout the encounter. ![]() Wall of Fire also works very well for this encounter, but all of these spells require Concentration, so be sure to use separate party members when casting.
Wall of Fire also works very well for this encounter, but all of these spells require Concentration, so be sure to use separate party members when casting.
Disintegrate Lorroakan, Bind The Elementals
Put Those Rare Scrolls To Good Use

This infamous encounter in Ramazith’s Tower will be incredibly frustrating without a solid plan – and some useful scrolls. First, make sure a caster in the party has access to ![]() Disintegrate , or a
Disintegrate , or a  Scroll of Disintegrate can be purchased at The Bibliophile in the Lower City. Using this on Lorroakan will take out virtually all of his health, if not killing him instantly.
The second important step here is to cast ![]() Planar Binding on as many of Lorroakan’s elemental summons as possible. Any Bard, Cleric, Wizard, or Druid can cast Planar Binding by Level 9, so it’s possible to have each party member bind all the elementals in this fight. A
Planar Binding on as many of Lorroakan’s elemental summons as possible. Any Bard, Cleric, Wizard, or Druid can cast Planar Binding by Level 9, so it’s possible to have each party member bind all the elementals in this fight. A  Scroll of Planar Binding can also be purchased, looted, or stolen from Lady Esther on the Rosymorn Monastery Trail in Act 2.
Ansur: The Undead Dragon
The Crystals Are The Answer To Ansur’s Charged Attacks

Anyone attempting to defeat Ansur, the Undead dragon, has likely fallen victim to its devastating charged Lightning attacks, but the environment can be used to the party’s advantage in this arena.
It will also be very useful to bring a caster with access to Dimension Door and ![]() Globe of Invulnerability , or scrolls for these spells. While the crystals provide a two-turn resistance to Lightning damage, the encounter will still be challenging without some mobility and defensive tactics. Use Dimension Door to move the party longer distances, and Globe of Invulnerability as a refuge in case something goes wrong.
Globe of Invulnerability , or scrolls for these spells. While the crystals provide a two-turn resistance to Lightning damage, the encounter will still be challenging without some mobility and defensive tactics. Use Dimension Door to move the party longer distances, and Globe of Invulnerability as a refuge in case something goes wrong.
Blowing Up Raphael’s Pillars Of Hope
Place Explosives Around The Pillars Before The Fight Begins

One of the most challenging encounters of BG3, Raphael’s House of Hope fight, will be incredibly tough without knowing how the pillars in the room work. Each Soul Pillar gives Raphael several buffs and advantages, but you can easily bypass the challenge of this encounter by placing explosives such as Runepowder or Smokepowder Barrels around the pillars before the fight begins. Then, simply blow the barrels up to destroy the pillars and negate most of Raphael’s power.
While these strategies certainly make the toughest encounters much easier, they still require careful planning and know-how. Depending on your difficulty level, these methods may also need to be tweaked slightly, especially with Legendary abilities in Honour Mode that will make tough fights such as Ansur even harder. Whether it’s finally putting those old scrolls to use, taking advantage of the environment, or using some cunning trickery, there are plenty of ways to make tough encounters easier in Baldur’s Gate 3.
News

THE PIWELL BIBLE: 23 ‘ILLEGAL’ TIPS EXPOSE THE HIDDEN INNER WORKINGS OF CRIMSON DESERT
YOU’VE BEEN PLAYING WRONG! 🛑 23 Crimson Desert secrets the game NEVER tells you! No health potions? No problem. Learn the “Blinding Flash” cooking hack to heal anywhere and the “Abyss Teleport” trick to cross the map in seconds! 📉…

NEED FOR SPEED: CRIMSON DESERT PLAYERS DITCH PLATE ARMOR FOR ‘MAGIC ROBES’ TO UNLOCK BROKEN ATTACK SPEEDS
DPS KING UNLOCKED! 👑 Why “Tariv Sorcerer” is secretly the best armor set in Crimson Desert! Think all armors are just for looks? You’re wrong. Insiders found the only gloves that actually boost your weapon’s attack speed! 📉 While other…

BEYOND THE CAP: ‘CRIMSON DESERT’ VETERANS UNCOVER SECRET RESEARCH AND LASER-ARMED HELMETS
200 HOURS IN & I HAD NO CLUE! 🤯 Top 10 things even “Experts” missed in Crimson Desert! Did you know there’s a helmet that shoots LASERS? Or that you can finally see enemy health bars without using mods? 📉…

WOLF IN CLOTHING: ‘CRIMSON DESERT’ PLAYERS UNCOVER ‘BRIBERY’ SCHEME TO UNLOCK SECRET GREYWOLF ARMOR
LOOK LIKE A PREDATOR! 🐺 Stop missing the “Secret” Greywolf Armor set in Crimson Desert! Is your early-game armor looking “trash”? Insiders just found the Greywolf Leather set, but most players only ever find half of it! 📉 Unlock the…
ICE COLD VICTORY: ‘CRIMSON DESERT’ PLAYERS USE ‘FORCE PALM’ LOOP TO HUMILIATE ANTUMBRA’S SWORD
STUCK ON ANTUMBRA? ⚔️ This “One-Button” strategy makes the hardest boss in Crimson Desert look like a joke! Tired of getting frozen and teleported to death? Insiders just leaked the “Force Palm + Focus” loop that locks Antumbra down for…

GEAR GIANTS: ‘CRIMSON DESERT’ PLAYERS UNCOVER HIDDEN ARSENAL OF SHOTGUN SHIELDS AND LIGHTNING FANS
SHAMAN VIBES OR GOD MODE? ⚡ Top 10 “Secret” Weapons you can grab EARLY in Crimson Desert! From the 30-base attack Electro Mega Spear to a literal “Shotgun Shield”—why are most players still using basic gear? 📉 Discover the hidden…
End of content
No more pages to load